Saturday, May 30, 2009

How I Plant My Tomatoes

I use the Florida Weave to keep my tomatoes propped up off the ground, so the first thing I do before planting is get everything setup to receive the tomatoes. I space my tomatoes two feet apart with supports essentially every four feet putting two tomatoes between supports with about a foot between the nearest tomato plants and the support. To help keep everything marked I push little pieces of wood where the tomatoes will go. There won't be any stringing for a while yet, but since driving the 8 foot tall stakes into the ground is a production I do it well in advance so as not to disturb the root systems of the tomatoes.

I then go around and dig out the hole for all of the tomatoes at the same time. Last year I didn't do this and had issues with excavating holes next to planted tomatoes. This also let me sprinkle some Tomato Tone fertilizer over the whole bed once the holes were dug. The theory being that when I fill the holes back in there should be a fairly even distribution of fertilizer at all depths. I like to bury my tomato plants so that only the top one or two branches are above ground. The stem should produce roots along the length that is buried for extra nutrient absorbing power! I place the tomato in the hole to make sure the depth is correct and either remove or add soil to adjust the height.

Once the height it correct I then remove the leaves from the lower branches leaving just the branches. These two can potentially put out additional roots. I label all of my pots with the variety of tomato in them. At this point I write the variety name onto the side of the stake closest to the plant. I use a sharpie and this helps me keep which plants are which straight.

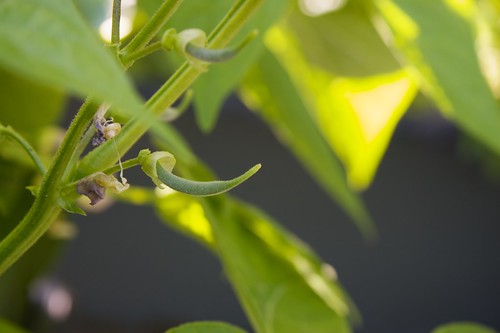
After that step is done I fill in the hole with soil and water liberally. If you have mulch available to prevent soil splash onto the leaves then now would be a good time to apply it. After I planted my tomatoes I planted carrots and beans around them to provide ground cover when they come up, so smothering them with mulch was out of the question. I also plant basil among the tomato plants for easy access to basil + tomato when I'm munching in the garden and because the basil discourages some tomato pests from hanging around.

Thursday, May 28, 2009

The Dragonflies have Arrived


The dragonflies have finally arrived in force and when they stayed still I managed some photos this weekend. I was really happy to get this image because it was really windy this weekend and the asparagus was flopping all over the place with this guy on it. Trying to get him into the field of focus was hard enough that there were many photos on the cutting room floor.


The color on this guy was so brilliant I had to chase him around until he stopped to pose.


He let me get fairly close after flying away a number of times.


I felt like he was looking up and winking at me before he flew off as this was the last photo I got of him.

Wednesday, May 27, 2009

The Mustard Family

The mustard family of plants contains quite a few tasty veggies: cabbage, broccoli, kale, Brussels sprouts, turnips, radishes, and of course mustard. The family also contains many flowers and weedy plants, few of which I would suspect of being edible – but in fact, they all are!


This is Dame’s Rocket, a pesky-but-beautiful non-native member of the family that has earned itself a place on the Massachusetts Prohibited Plant list. I gave it a taste, and it wasn’t bad, except that the leaves were furry. I would have to be starving to eat a salad made up of furry greens.

Here is another nuisance mustard-family member introduced by gardeners: Yellow rocket, Barbarea vulgaris. Unfortunately I forgot to taste this one before killing it.


This is a weed that I deliberately planted, because it is a native plant, and I am curious about it: Tower mustard, Arabis glabra. (Thanks Marna!)


I love that the unopened buds look like broccoli buds.

After watching my tower mustards bolt, I’m not sure that I find them to be interesting enough to plant in a garden, and the leaves are too small to bother harvesting as edibles. But I may let them go to seed just to grow them in the “lawn”.

Speaking of the mustard family, check out what our friend Hero grew!

Monday, May 25, 2009

Pollinating


Two weeks ago I followed this little fella around Gabe's Garden, from strawberry blossoms to blueberry blossoms. Alas, I don't know what kind of bug he is.

[edit] Eristalis transversa, transverse flower fly, maybe?

6:55 P.M.


Every night, for a window of about ten minutes, sunlight slants in through the woods to illuminate one fern-covered rock. For that ten minutes, the wetland glows like a perfectly-lit movie set. It's breathtaking. I'm usually up to my elbow in dishes or dinner when I spy the view from over the kitchen sink, but over the weekend I sent Chris out with the camera to capture the scene for me. Thanks Chris!

Memorial Day was Garden Day in Honor My Grandpa Brege

My Grandpa Brege served in World War II, and throughout his life he regaled me with many stories from his time on the front in Italy and elsewhere. My grandpa Brege was a master gardener and much of my joy of gardening is passed down through his love of it and the love of gardening he instilled in my mother. I have very fond memories of eating fresh peas and other veggies in the garden and I hope I can provide Gabe with similar memories.

Though he served our country bravely as a warrior when he was called upon to do so, I believe he would have preferred to just be a farmer if life had allowed him to be one. I found out through the grapevine recently that my grandfather Brege has died. Our family is, well, complicated, and while I haven't seen him in some years I continue to carry him in my heart, and I honored his memory today by spending the whole scorching day out in the garden finishing off the spring planting. At the end of the day when I looked down at my soil-covered hands and ragged cuticles I thought of his gentle, calloused hands, caring smile, and his loamy smell. Then I smiled, and cried.

Michelle had done an amazing amount of work excavating a round hole in the front yard where she was planning on putting in bamboo, until she thought better of it. She let me plant some front yard veggies in it. There are three cherry tomato plants: a Lollipop (yellow), Black Cherry (purple), and Isis Candy Cherry (red). They are surrounded by a ring of onions, and there is a Hubbard squash plant in the middle. I then planted Nasturtiums in between everything else, and Michelle added French marigolds all around the edge. I'm hoping that it fills in nicely and that the bunny living in our bushes leaves it alone.

I took more pictures of interesting bugs as I worked in the garden this weekend and I look forward to posting them soon. Have a happy memorial day.

An Earthbox Memorial Day

My goal for today was to try to get my remaining, empty Earthbox filled. I was planning on planting leeks in it - but after stopping at all of the garden centers over the past few weeks (and again today), I gave up my search for leek seedlings. So, I thought that I would try to start them from seed - ran over to find a packet...and there were none!

Argh!

I suppose I'll have to catalog order them next year and start them myself. Instead of leeks, I decided that Earthbox #5 would be an experimental box (last year, I experimented with watermelon). Rather than trying something exotic (like watermelon...for this region) again, I wanted to attempt a root vegetable. I picked up a packet of Burpee carrot seeds: short, sweet, 4-5" long ones that won't get caught up in the grid at the bottom of the Earthbox. I sowed them directly into the box, 2-3 per hole. I'll thin them out when they pop up. Hopefully I'll get around 25-30 carrots in the box.

On the pest note - I'm also seeing aphids and spider mites hanging around my tomato plants and peas more, so I sprayed more of my insecticidal soap on all of the plants.

I have green beans forming:
Baby Green Beans

Yay :)

My roma tomato plants haven't yet reached their cage/netting yet, so I had to support them with a bamboo stake until they get tall enough to start weaving them into the netting. They have also started setting some early fruit!

Little Roma

I can't wait to taste em!

A Raised Vegetable Bed - A Journey

Chris and Michelle asked me to contribute my experience creating a raised vegetable bed in our back yard. While my wife, Bridget, likes flower gardening, I like growing herbs and vegetables. I base a plant's importance on whether or not I can eat it. If I can't, it ceases to interest me, much to my wife's dismay.

Since my wife decided that there wasn't enough room to plant vegetables in the existing flower bed, so coveted because of its full-sun location, we ended up creating a new bed just for vegetables right next to it. My wife found an interesting article on the HGTV site about building raised beds. However, as you'll see, ours wasn't as elaborate.

Below are some diagrams of the design and dimensions (Sorry for the poor renderings, I was in a hurry). We ended up using untreated pine, though we wanted to use cedar because it’s a hardwood and would last the longest. The cedar planks, however, were very expensive and didn’t come readily available in the dimensions we needed.

The materials used were
  • (2) 1.5x3x12 planks
  • (2) 1.5x8x12 planks
  • (4) 4x4x12 planks
  • (16) 3/8 Carriage Bolts
We stained the outside, top and bottom edges of the frame to make it more water resistant. We didn't stain the inside because we didn't want the chemicals to leach into the soil.

*Disclaimer: As you'll notice in the images below of the actual construction, we messed up the on the corners and created a gap. Something to learn from in the future. Moral of the story: Measure twice, cut once.


After we bought the materials and assembled the frame, we marked out a spot on the lawn that receives the most direct sun throughout the day.


Because the area had some really nice grass that I didn't want to just rip up, we transplanted it to an area next to the compost pile that had sparse grass.

We set the frame of the vegetable bed into the hole created by removing the grass sod. We dug down a little further on one side (about 2-3 inches) to level the frame because our backyard has a gradual slope.

We then headed down to a local garden center and asked their advice on what to put into the box. They recommended we get 3 bags of stones for drainage, 14 bags of Bumper Crop organic top soil (a combination of soil, peat moss, and organic fertilizer), and a jar of Soil Moist Plus. The Soil Moist Plus is supposed to absorb water, and then when the soil begins to dry, it releases water back into the soil along with extra nutrients. We loaded up our VW bus with all our supplies, which filled up almost the whole car, and headed back home.


We first layered the rocks in the bottom of the bed and spread two bags of Bumper Crop on top. Then we sprinkled the Soil Moist Plus, watered it, and waited about ten minutes to give the gel beads a chance to absorb the water and expand.


We then spread the rest of the soil in the box but only wound up using 11 bags. We started out by planting asparagus, 5 zucchinis, 5 cucumber, 2 cherry tomato plants and a basil. The zucchinis and cucumber I sprouted from seedlings using a Jiffy Peat Moss growing kit.

We decided to put the cherry tomato plants closer to the asparagus because asparagus beetles hate the smell of tomato plants and could help ward them off. from what I've been told planting even one zucchinis or cucumber plants is one too much, so we might giving away a ton of vegetables to friends and family soon enough.

So that's it for now! More was added to the garden since these images were taken and will post them soon.

-S

Saturday, May 23, 2009

Flea Beetles, Aphids, Katydids, and Those Who Eat Them

It is quite rude little thief.
To sit and nibble my leaf.
Those bits I need,
To grow large from my seed.
Know I will feel no grief,
If crushing fingers make your life brief.

The flea beetles and aphids are out in force this year. I don't remember them being half this bad last year. I probably squished three dozen flea beetles over the past two days and thousands of aphids. My technique for killing flea beetles is to quickly grab them between my thumb and finger. A very fast pinch is key to getting them before they jump off. However, I do not really crush them to kill them. Instead once I have them trapped I gently roll them between my thumb and finger to the edge of the leaf and then crush/grind them once they are free of the leaf. This prevents damage to the leaf.

The aphids I've been managing to get before they hit critical mass on either my tomatoes or pea plants. At present I'm only finding the fly variety with maybe a handful of offspring, which are very easy to dispatch.

The black and red aphid varieties are the easiest to spot, and to my eye the fastest to breed. It is shocking how fast a flying aphid can pop out a half dozen or more baby aphids.

Luckily the plants have been strong enough that the aphids don't seem to have caused any damage. If left unchecked though I'm sure they would run rampant. I saw one twice-stabbed ladybug the other day in the garden, but no others. My kingdom for a nice pile of ladybugs!

I don't remember seeing any katydids in the garden until July last year, but today a juvenile was sitting on one of my tomatoes. The pests are bad enough this year that I'm contemplating using some soap spray to kill off all those my pinching fingers haven't been able to find. Still I haven't because of little guys like these.

I believe this is a baby orb spider. She was sitting on one of the pea tendrils floating on the breeze. This made it incredibly difficult to get a good picture because it was so small and moving rather quickly on the wind. It was probably about 3 mm long.

As I was grooming my tomato plants and removing aphids and squishing flea beetles I came across this little spider that had setup shop on a sun damaged tomato leaf. Its web was full of aphids, which made me so happy!

Munch and crunch them!


Often confused with spiders this Harvestmen of the order Opiliones is an Arachnida, but not a spider. They do eat soft-bodied insects like aphids and as such are always welcome in my garden.


In this photo you can see the cool eyes on the Daddy long legs and the fused together body which is also unlike a spider's separate abdomen and cephalothorax.


Lastly we have this little guy who had a delicate web spun between dried out basil stalks from the previous year. There wasn't anything in his web, and he looked kind of hungry. Since he was in a pot he's been moved into the garden away from the house so he has a better shot at some dinner.

Earthbox Peas: Success!

I have peas on my vines! Yay!

Yay Peas!

Thursday, May 21, 2009

It's a Good Year for Jacks

The yard must be chock full of jack-in-the-pulpit seeds that have been waiting for conditions to be just right, because they are germinating like mad. The established plants have been leaping up and flowering, too, including some bulbs I had experimentally plopped into a fairly dry location last summer.

Jacks, Arisaema triphyllum, are native, and they grow in moist shady locations. In a short while they will be done flowering. Later in the summer, the females will produce a dramatic cluster of bright red berries.

Jacks aren't carniverous, but they have that look about them. Mine seem to come in two varieties: all green, and green with purple bits. Here are photos of one of the purple ones. That blurry pink thing is my thumb.


Wednesday, May 20, 2009

Yard Montages

The first flowers of Spring are exciting, but what really moves me is when everything goes green. Here is our front yard shot from a few locations, and patched together from multiple photos. This does make the yard look wider than it actually is, but it is a big yard!


I shot these photos last weekend when it was too wet to mow. The gra. . . I mean weeds. . . are getting high enough to pose a tick threat, so when we got home today, Chris mowed a path to the garden and out to the woods for me, so that we aren't cut off until the weekend.

I am beginning to lust after neat, mulched walks edged with flowers. Grass makes me squeamish now.

Just this afternoon I was reading through the blog of a kindred clueless gardener. He has now had Lymes disease three times, and practically wears a haz-mat suit into his garden. And here I thought I was just being paranoid by always tucking my pants into my socks!

But back to moderately more happy thoughts. . . if you look closely, you can see Chris' birthday present there in between the deer-munched yew and the unwanted-but-can't-afford-to-replace-yet invasive burning bush. Here is a close-up:


This is a stacking rain barrel made by Arid Solutions, Inc. So far, it's been so-so. It matches the color of the house, which is a big plus; and we never seem to run out of refills for the watering-can from it. However, in our excitement, we neglected to follow the instructions that said "assemble on a flat surface" and "don't force it, dummies!" We screwed it together crooked, and too tight to undo, so now the connecting parts are trashed, and only the bottom tank holds water. We are waiting to hear back from the company about whether they can sell us replacement connecting parts.